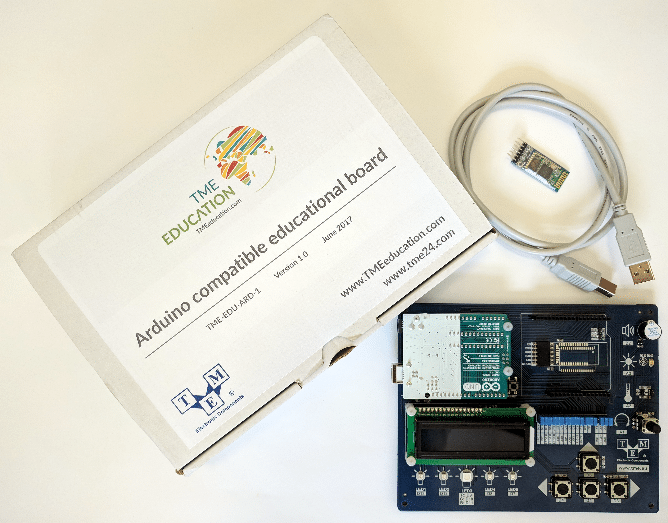
The TME-EDU-ARD-1 development board will soon be included in the catalogue of products of Transfer Multisort Elektronik of Łódź. However, thanks to the courtesy of its manufacturer, we had the opportunity to get a close preview. We were given 14 kits. Since there were so many of them, we've all had an opportunity to play around with the boards individually as well as test them out "for real" on three groups of students during classes at the Institute of Electronics of Lodz University of Technology . The boards were used during a single semester at the workshops of Lodz Children's University (one group of 12 children, 20 hours) and in laboratories during microcontroller programming lessons of the Automation and Robotics students of the Faculty of Mechanical Engineering of Lodz University of Technology (2 groups, approx. 16 students each, 15 hours per group).

Technical description
The aesthetically appealing cardboard box contains everything you need to get started: a base board with the original Arduino UNO R3 evaluation board mounted on top of it, a Bluetooth v2.0+EDR wireless communication module (the popular HC-06) and a USB cable.
We are not going to go into detail about all the features of the Arduino UNO platform here – there are plenty materials on this subject available online. If you'd like to learn more, we encourage you to visit the source site or check out relevant courses. Instead, we will be focusing on substantive evaluation of the whole package as an educational kit for beginners.

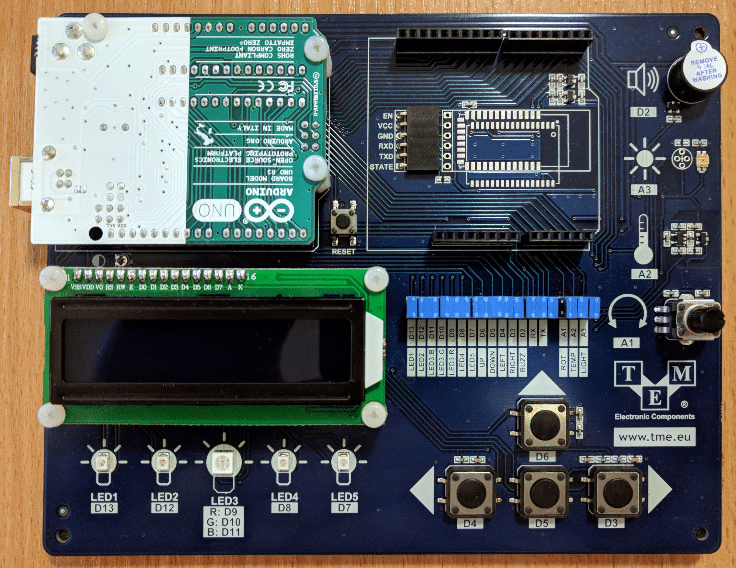
The base board is almost a regular extension (shield) developed especially for the Arduino UNO platform – you won't find anything more than a well-thought-out, suitable, well-labeled and logically designed kit of test peripherals that includes the following:
• four-key keyboard (directional keys: left, right, up, down);
• four blue LEDs (LED1, 2, 4, and 5);
• one RBG LED (LED3);
• piezoelectric sound transducer (buzzer) with an embedded generator;
• character LCD display;
• pin connector for the Bluetooth wireless communication module;
• rotary potentiometer;
• MCP9701 analogue temperature sensor;
• light sensor based on a phototransistor;
• connector for additional extension modules (shields) in the ARDUINO standard.
The keyboard and the LEDs are connected to the digital pins of the ARDUINO UNO board and the RGB diode is connected to the pins enabling operation in PWM mode. The potentiometer, temperature sensor and light sensor are connected to the analogue inputs. The LCD display (2x16 character module based on the ever-popular Hitachi HD44780) is connected via the I2C bus expander. The board also features a button for zeroing the control microcontroller (RESET) because the Arduino board is mounted upside-down, making its reset button unreachable. Each of the peripherals can be disconnected from the Arduino board thanks to a set of jumpers in the central part of the base board. This solution lets you connect additional expansion modules (shields) e.g with power terminals for engine control. In this case the only limitation could be restricted space for such a module, since the larger expansion modules will collide with the ARDUINO board located on the left side. What's more, the larger modules could obstruct the RESET button. The expansion module sockets or jumpers connecting the pins of the Arduino UNO board to peripherals can also be used as convenient testing points for connecting an oscilloscope or a logic analyser.
The creative solution to the issue of integrating a large number of peripherals on the base board (the counter-intuitive, upside-down mounting of the Arduino UNO) works very well. Due to its size, the board rests solidly on a desk. There are no issues with its stability when using keys, and the diodes are very visible (almost too visible, in fact). If you've ever used similarly built expansion modules (shields) for the Arduino platform that were an attempt to integrate a large number of peripherals on a surface slightly bigger than the classic Arduino UNO, you will surely appreciate this board's size and the clever placement of its components. Another feature that absolutely deserves praise is the clear labeling of peripherals. There is no need to look at the circuit diagram or use your notes when you want to check the lines of the Arduino to which the keys, diodes or analogue peripherals are connected. The jumpers used for disconnecting peripherals are clearly labeled as well. There are large, convenient feet attached to the bottom of the board at each of its corners that ensure its stability during work. It should be noted that the producer provides (in the form of downloadable documents) both the circuit diagram of the development board and a sample demonstration software (loaded onto the board by default) that can serve as a starting point for developing custom applications.

All of the board's components are of excellent quality. The Arduino UNO module and the LCD display are bolted by default (with spacers) to the base board. The entire kit looks very solid and should ensure a long period of failure-free work (even in educational applications with a large number of users). During the semester each of the boards we received has been used by students for at least 50 class hours. Out of all 14 boards none were damaged.
The board is easily compatible with the ARDUINO IDE programming environment. Use of the original Arduino UNO R3 ensures that the board is recognised and supported by that environment without any problems. Since the Arduino bootloader protocol is supported by the AVRDUDE software, you can use other programming environments that support the ATmega328P microcontroller. This allows you to bypass the limitations imposed upon programmers by the Arduino software and quite freely choose your own programming language. This freedom ensures a longer lifetime of the Arduino UNO/MEGA platforms, and in turn of the TME-EDU-ARD-1 prototype board. We use the ATMEL STUDIO software during our classes, it can easily be configured to work with Arduino boards.
A little bit of (constructive) criticism
During the six months of using the TME-EDU-ARD-1 development board we did notice some minor inconveniences.
One of those shortcomings is the lack of a diode signaling that the test board is being powered. The Arduino UNO does have such a diode, but it is concealed due to the upside-down mounting of that board. If the LCD screen wasn't backlit, we'd have no idea that the board is carrying supply voltage.
From the educational application standpoint, the biggest issue is the way in which the LCD screen control was implemented. The limited number of pins on the Arduino UNO board has dictated the use of an I2C expander: the popular and well-known MCP23008 integrated circuit. This type of display connection only complicates its configuration for beginner programmers. The necessity to install additional libraries, implement a series of "#include" directives, and the complex sequence of display object definitions might all seem like rocket science to beginners and could be quite difficult for the teacher to explain. Treating the whole initialisation procedure as a "black box" without going into detail would really simplify things. It would also allow the producer to consider compiling a dedicated Arduino library and hide the display configuration details within it.
The final issue is the lack of labeling for the additional expansion module connector. This connector was used during our classes to connect cables e.g. to engine power terminals; no labeling made our work more difficult.
The aforementioned shortcomings do not lower the TME-EDU-ARD-1 development board's value in the learning process.
Suggested development directions for the project.
One could obviously consider integrating more peripherals in future versions, such as 7-segment displays, OLED graphic display, or a real time clock (RTC) on the I2C bus. Those peripherals would surely be appreciated by the users. However, the problem of limited control outputs on the Arduino UNO should be solved satisfactorily, or support should be given in the form of dedicated libraries provided by the producer for total beginners.
It might also be a good idea to consider adding an option of wirelessly programming the Arduino UNO via Bluetooth (SPP profile). Of course this would still require supplying power, but this could be a function appreciated by those that use the board as a part of a bigger system in an area that's not easily accessible and offers limited disassembly capabilities.
We of course realise that this is a board targeted at beginners, but technically one could consider using it as an expansion for other platforms compatible with the Arduino UNO R3 expansion standard – e.g. for the STM32 Nucleo evaluation boards. This ability could extend the lifetime of base platform even further, as well as expand the potential user base by including people interested in 32-bit ARM Cortex-Mx architecture. The STM32 Nucleo boards are available at very attractive prices, come with an embedded debugger, expansion connector compatible with the Arduino UNO R3 standard, and have the same issues: limited number of default peripherals and the necessity to use expansion boards. The current version of the board does not allow for mechanically mounting the Nucleo board in the TME-EDU-ARD-1 connector (not enough space next to the LCD display).
Summary
The TME-EDU-ARD-1 evaluation kits we received from their manufacturer – TME – have proved to be excellent platforms for learning the basics of single-circuit microcontroller programming and digital electronics, while using both the "Arduino language" and the Arduino IDE environment, as well as the C/C++ programming languages and the Atmel Studio software. The kits have passed their test – both from the teaching application standpoint, their mechanical construction, as well as their resistance to possible issues resulting from a large number of users.
Our comments and suggested development possibilities of the TME-EDU-ARD-1 platform were submitted to the manufacturer. We also have unofficial information that a new version of this development tool is already being developed. The manufacturer's cooperativeness and openness to feedback coming directly from the users of their tools makes us hopeful for the future of the TME educational platform. The board we have reviewed is its first component.


